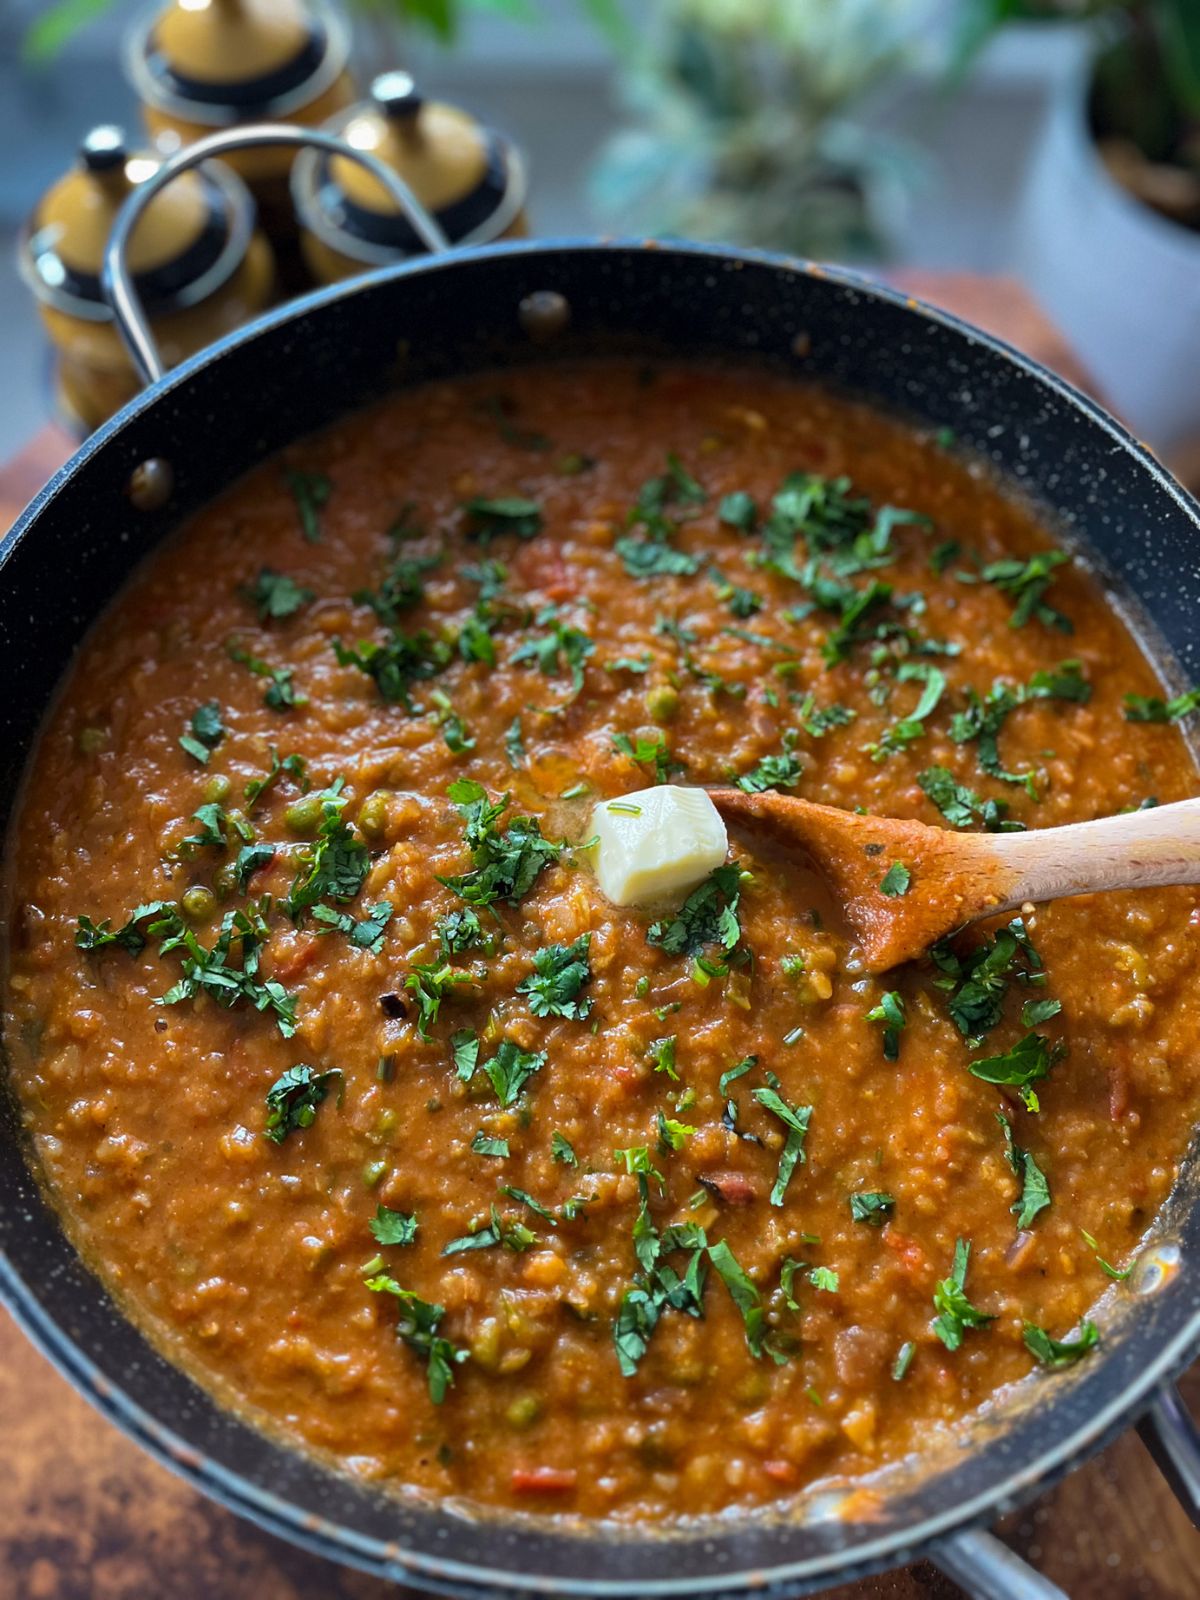
This Mumbai street-style pav bhaji is a must-try, especially if you want to give your leftover veggies a delicious, spicy makeover! By the end, you’ll be licking every last bit of gravy off your fingers – it’s that good!
Jump to:
What is Pav Bhaji?
Pav means dinner rolls or buns and Bhaji means sabzi or veggie preparations. This is is a street food where a variety of boiled vegetables are cooked with butter and spices and served with fresh pillowy buttery dinner rolls along side crunchy onions and lemon wedges. This street food is said to have originated from Mumbai in India but is now popular through out the country and is a household favourite for almost everyone!. now I have never been to Mumbai but my husband has been and together with his passionate interest and honest critics when it comes to food, especially street food we’ve cracked the recipe to make it taste pretty close to the authentic Mumbai Street Food style that you’ll be licking your fingers off, we guarantee!
💡Did you know? Pav, the soft and fluffy bread roll that completes Mumbai’s beloved pav bhaji, has Portuguese roots! The word “pav” comes from the Portuguese word “pão”, meaning bread. When the Portuguese colonized parts of India, including Goa, they introduced their style of bread-making, which eventually made its way to Mumbai’s street food scene. Over time, local bakers adapted it, and today, pav is an essential part of Mumbai’s iconic dishes like vada pav, misal pav, and, of course, pav bhaji!
💌Why I Love This Pav Bhaji
I love pav bhaji simply because it makes vegetables come to life especially if you have a bunch of them and not sure what to make out of it then pav bhaji always comes to rescue! With this recipe, you are helping reduce food waste as you can use a bunch of veggies and make a delicious recipe that you will truly love!
It’s called a street food which is usually associated to junk food but pav bhaji is actually pretty healthy well at least the homemade version where we use a diverse range of selected veggies making it fibrous and good for our gut! sometimes we also end up eating this with roti or paratha or rice especially when its leftover instead of buns if you want to switch it up and make it healthier!
I also love that it’s relatively easy to make this recipe, the real hard work is in cutting all veggies but if you have a food chopper then its super easy! or else get your partner or someone to help you chop them up – will be worth the reward.
You can also switch up any of the veggies that you have in your kitchen, it will all taste great! Like I said, try to revive any veggies you see going bad with this recipe and you’ll be proud of yourself for reducing food waste so with that I hope you enjoy this just as much as I did.
~with love, Jahnvi
🛒 Ingredients used in this pav bhaji recipe:

📝Notes on Ingredients:
- Veggies: You can substitute or add any veggies of your preference like cabbage, eggplant, etc.
- Spice blends: Pav Bhaji Masala, Kashmiri red chilli powder (this is less spicy and gives a darker red colour), Coriander powder, turmeric powder and a pinch of garam masala. Feel free to adjust or replace spices available in your kitchen. Also used 2 green chillies for a stronger kick since we are using less spicy red chili powder.
- Aromatics: We use minced garlic, you can use store bought garlic paste as well.
👨🍳Recipe Success Tips:
- Using beet to bring out that deep red colour without using any excessive red chilli powder or artificial colouring and you can’t taste the beet at all if that is your concern!
- Don’t boil all veggies together especially if using cauliflower as this tends to leave a strong unusual smell and will infuse it to all other veggies alongside it so best to boil this separately in a pot. And for green peppers sauteing them is best than boiling it for that subtle crunch.
- You don’t need to mash veggies directly – once we assemble it all into the pot we will mash it together so it is even and prevents from an excessive lumpy texture.
Step by Step Instructions:
Cooking and Chopping the Vegetables:
1️⃣ Chop onions, tomatoes, green peppers and coriander separately and set aside.
2️⃣ Boil 4 veggies: boil potatoes, beet, cauliflower and peas separately in a pot/pressure cooker. NOTE: if you choose to boil all veggies together then just ensure to boil cauliflower in a separate pot as it tends to leave a strong smell which infuses with other veggies and then your pav bhaji tastes like some plain boiled veggies so highly recommend boiling cauliflower separately with some salt and pinch of turmeric powder.
For Gravy Base:
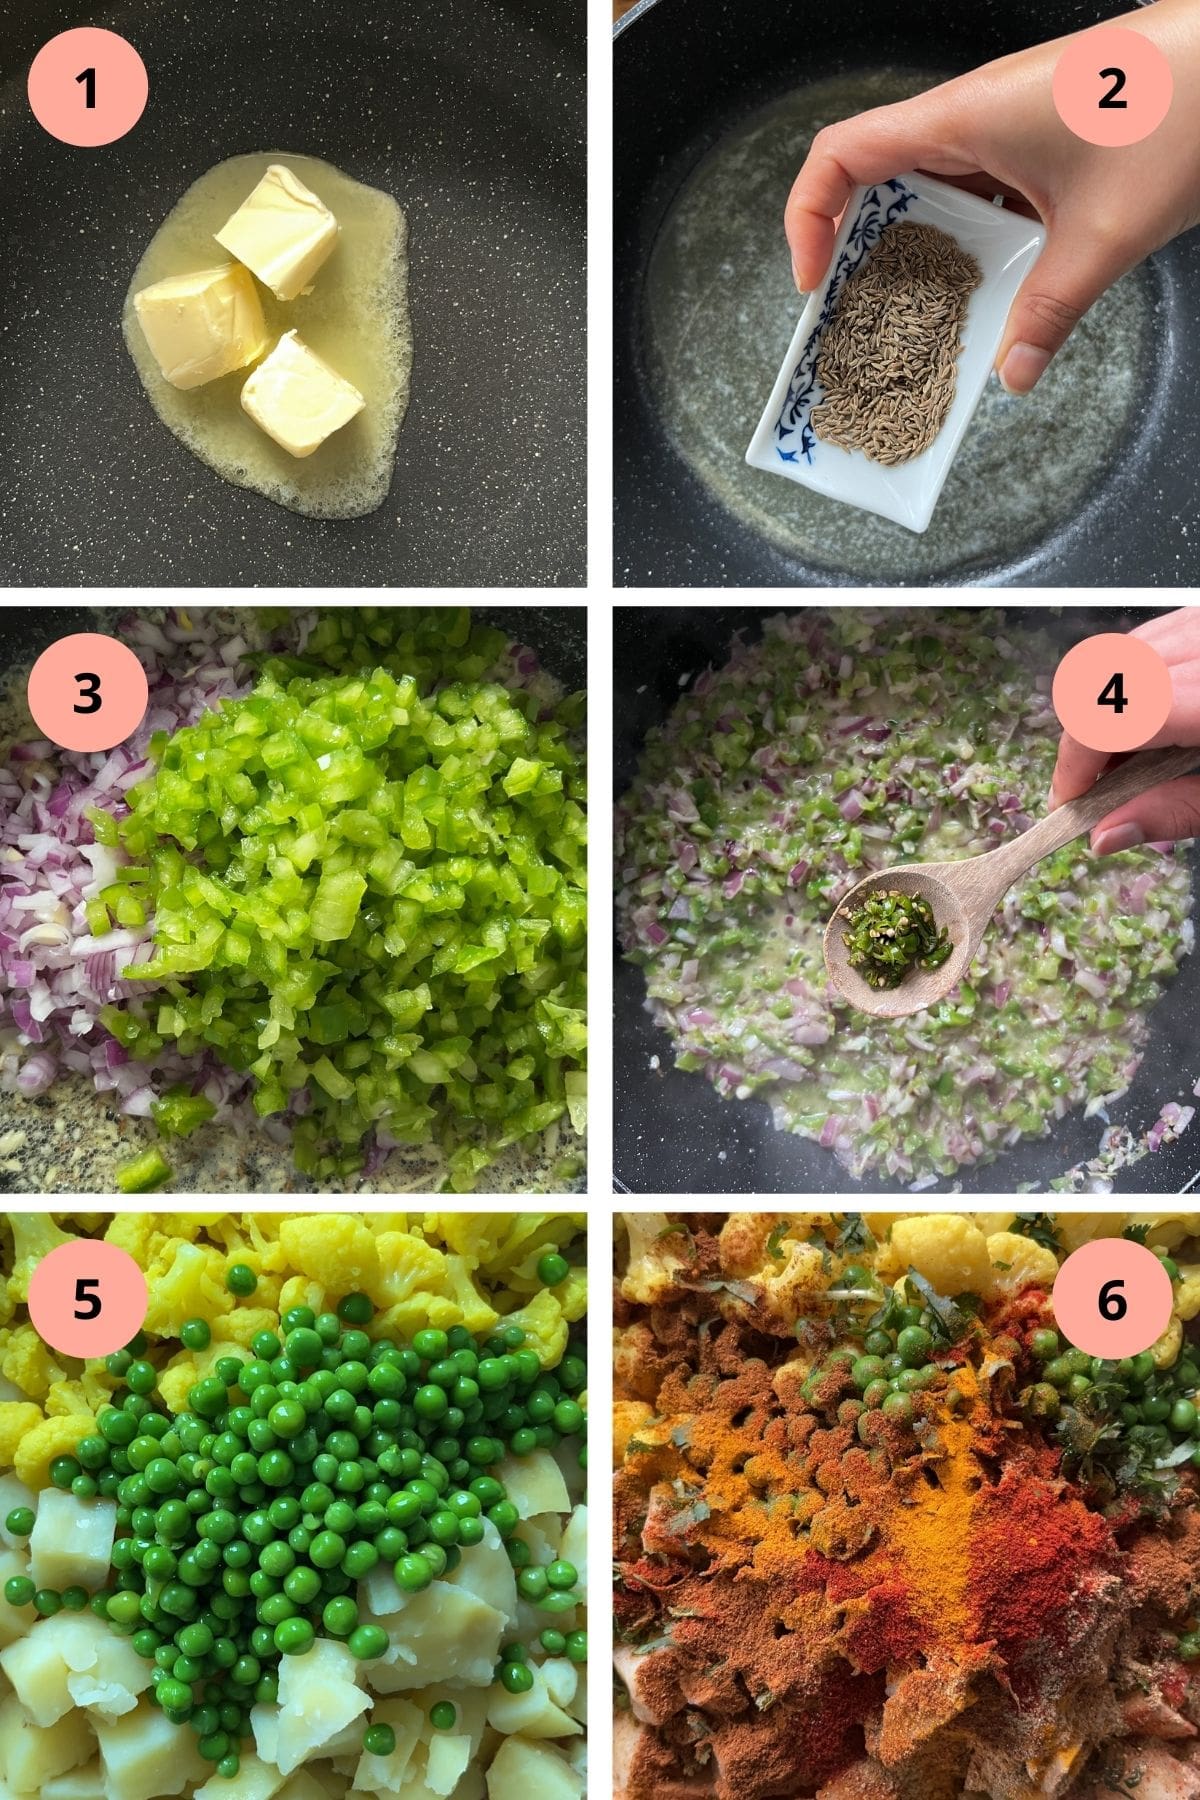
1️⃣ Heat butter & oil in a pan, crackle jeera, and sauté garlic paste.
2️⃣ Add onions & capsicum; cook for 2-3 minutes. Mix in boiled veggies, spices, and green chilli paste.
3️⃣ Pour 1-2 cups hot water and use a masher to mash the bhaji to your desired consistency (I love mine street-style thin!) while you mix. Let it cook for 15-20 minutes.
4️⃣ Do a taste check and adjust seasoning to your preference, lastly garnish with fresh coriander, butter, and a dash of lemon juice.
5️⃣ Serve piping hot with buttery, toasted pav.
😍 More Street Food Recipes?
We love street food so check out our favourites here:
- Masala Pav – This is a quick and easy recipe to make if you have leftover pav bhaji!
👋 Conclusion
I hope you enjoyed this street style Pav Bhaji recipe and feel inspired to make it in your kitchen!
Made this recipe? Please consider leaving a review or comment below. This helps more readers find my content. You can also send me a DM on my Instagram letting me know your thoughts, I’d love to hear from you xoxo
How to Make Mumbai Street Style Pav Bhaji
Ingredients
- 2 tablespoon butter
- 2 teaspoon cumin seeds (jeera)
- 8-10 cloves of garlic paste
- 3 medium onion, chopped
- 2 medium green peppers, chopped
- 2 green chillies paste
- 8 medium tomatoes chopped
- 7 medium potatoes (boiled and mashed) with salt
- 1 medium size cauliflower – boil florets with salt and turmeric powder in a separate pot (see notes)
- 1 cup boiled peas
- ½ small beet – boiled and grated
- 1-2 cups water as desired consistency
- 1 tablespoon butter to garnish
- 1 handful fresh coriander to garnish
- 1 lemon wedges on the side
Spices:
- 2 tablespoon pav bhaji masala
- 1 teaspoon kashmiri red chilli
- 1 tablespoon coriander powder
- ½ teaspoon turmeric powder
- ¼ teaspoon garam masala
- ½ – 1 teaspoon salt per taste
Instructions
Cooking and Chopping the Vegetables:
- Chop onions, tomatoes, green peppers and coriander separately and set aside.3 medium onion, chopped, 8 medium tomatoes chopped, 2 medium green peppers, chopped
- Boil 4 veggies: boil potatoes, beet, cauliflower and peas separately in a pot/pressure cooker. (See Note 2)7 medium potatoes (boiled and mashed) with salt, 1 medium size cauliflower – boil florets with salt and turmeric powder in a separate pot (see notes), ½ small beet – boiled and grated, 1 cup boiled peas
For Gravy Base:
- Heat butter & oil in a pan, crackle jeera, and sauté garlic paste.2 tablespoon butter, 2 teaspoon cumin seeds (jeera), 8-10 cloves of garlic paste
- Add onions & capsicum; cook for 2-3 minutes. Mix in boiled veggies, spices, and green chilli paste.2 green chillies paste, 2 tablespoon pav bhaji masala, 1 teaspoon kashmiri red chilli, 1 tablespoon coriander powder, ½ teaspoon turmeric powder, ¼ teaspoon garam masala, ½ – 1 teaspoon salt per taste
- Pour 1-2 cups hot water and use a masher to mash the bhaji to your desired consistency (I love mine street-style thin!) while you mix. Let it cook for 15-20 minutes.1-2 cups water as desired consistency
- Do a taste check and adjust seasoning to your preference, lastly garnish with fresh coriander, butter, and a dash of lemon juice.1 tablespoon butter to garnish, 1 handful fresh coriander to garnish, 1 lemon wedges on the side
- Serve piping hot with buttery, toasted pav.
Notes
- Using beet to bring out that deep red colour without using any excessive red chilli powder or artificial colouring and you can’t taste the beet at all if that is your concern!
- Don’t boil all veggies together especially if using cauliflower as this tends to leave a strong unusual smell and will infuse it to all other veggies alongside it so best to boil this separately in a pot. And for green peppers sauteing them is best than boiling it for that subtle crunch.
- You don’t need to mash boiled veggies directly except for potatoes – once we assemble it all into the pot we will mash it together so it is even and prevents from an excessive lumpy texture.



Comments
No Comments